
")


- Hits: 1524
"Wang tiles" part 5
Before we start the next chapter it is wise to make a further 3 sets of textures.
1 - Grass. This will be your mid ground cover and the texture you see when you first load up the route. (assuming you are just above sea level, these values can be changed and will be explained)
2 - Sand. This I am using for the ground below sea level.
3 - Dry grass. This I am using for my upper ground.
4 - Small stones. (made in part 2) This we are using as our Rock gradient.
Adam explained it when we made Phorum a few months back, for reference Here is his post.
So, lets make our new terrain xml.
In your source folder, located somewhere like this (depending on where you have the game saved)
C:\Program Files (x86)\Steam\steamapps\common\railworks\Source
Make a Provider/Product folder set up so it looks like this:
C:\Program Files (x86)\Steam\steamapps\common\railworks\Source\RSderek\Bishop\Environment\Terrain
RSderek the provider and Bishop is the poduct.
Within that Bishop Folder make an Environment folder then a Terrain Folder.
Within that Terrain folder you can make other folders to seperate out your various textures so that they are easy to find, Grass, Rock, sand, urban, etc etc.
To begin with I made a folder called Core. Here I copied the 4 main textures needed to set up the route. (You don't need to set up 4, you can ref the same texture for all sections but a bit pointless as you would not see anything... :) )
Now the fun begins. Load up RWs and start the Blueprint editor.
Navigate to your Terrain folder and right click the folder, then select new Blueprint.
Scroll down the list to Terrain Texture blueprint, select it then click ok.
Rename the xml, I named mine Terrainset.
Below is an example of my basic parameters, set your something like it, looking back to Adams post for more refference.
For now leave the Procedural flora texture ID blank. (We (you) have not made that yet, this will be covered in a 'Wang epilog' post)
Click Save
Ok, Now to add your Textures to the xml.
Click on the little plus symbol at the top next to the work Mix tex.
This expands the texture area. Right click the texture in the core folder and select copy file name.
In the base texture name slot press Cntrl V to paste the string.
IMPORTANT: remember to remove the _A (it is not needed here)
Fill in the rest of the details like the image below.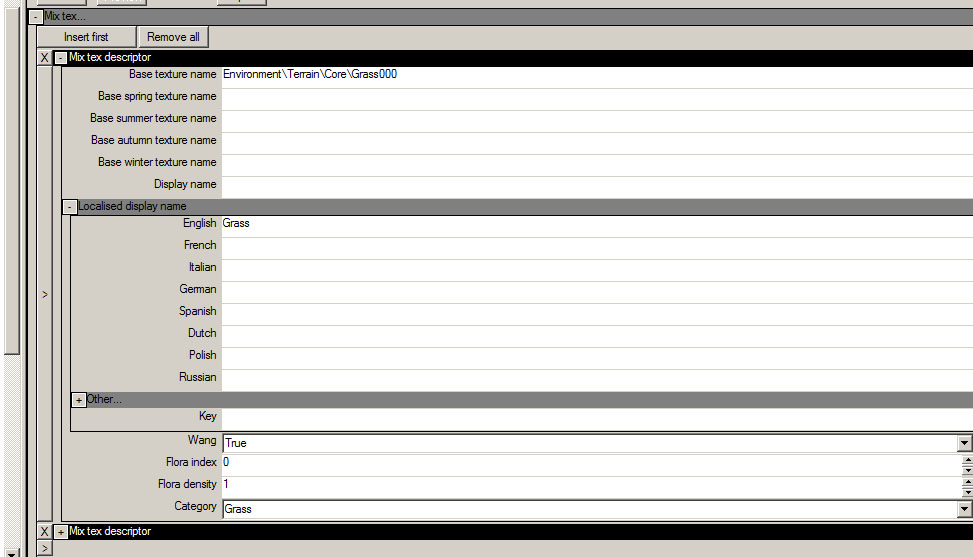
Click Save.
Click on the little > icon, this will open up another texture slot, it will need to be filled in as the first. (Make sure you match the correct texture to the ID number given in the low/mid/high texture index.)
Note also that this is the order that the textures will appear in your texture list in game.
When all done click save, then export.
- Hits: 1517
"Wang tiles" part 6
Load up RailWorks and Start the game.
Click on Routes, then New Routes.
Choose a template, for now just pick Default, (but the choice is yours) Click Create and give your Route a name, I called mine Bishop. Click ok and an empty route will load up with the default textures.
Close RailWorks.
Navigate to your Route folder. (something like: C:\Program Files (x86)\Steam\steamapps\common\railworks\Content\Routes )
Organise the folder by date, your new route will be at the top, I rename my route folders so I know which one is which. I added BISH in the second set of digits.
Inside that folder is a RouteProperties.xml
We are going to edit this file using Notepadd++ and reference our new terrain xml.
PLease note the correct way to do this is to set up your own Route template that is discussed on the WIKI
Ok, now that I am breaking all my own rules, please Note... Take care editing any xml in Notepadd++
1. Open the RouteProperties.xml in a text editor such as Notepad++
2. Browse to the following. I have highlighted the important bits in RED:

3. Change the parts highlighted in red to match the location (including product and provider) of the exported texturing file you have created.
4. Save the RouteProperties.xml then run RailWorks and load the route. Your new terrain textures should now be available.
5. If your new texturing file is in a provider/product which is not preloaded, you should tick it in the object set filters for that route so that it is preloaded next time.


- Hits: 1430
"Wang tiles" part 7
The cool thing about the terrain system is you can specify a different texture per season.
Also you don't have to make seasonal variations of each texture, you can just reference what you hvae in your list.
So, in my little test route using the same methods in earlier posts I made a Snow, Mud and meadow texture sets. I then referenced them on the season slots for mix map 1.
So, where every the grass is sprayed, in spring there will be a meadow, Autumn there will be mud and in winter there will be snow.
A good example of this in RWs is where we have a ploughed field in Spring, Cornfield in Summer, mud in Autumn with snow in winter. This really does help give your routes a different feel when driving in the different seasons. (Of course if you have a procedural grass texture you must take into account the changes and make season variations of the grass. (look out for further posts))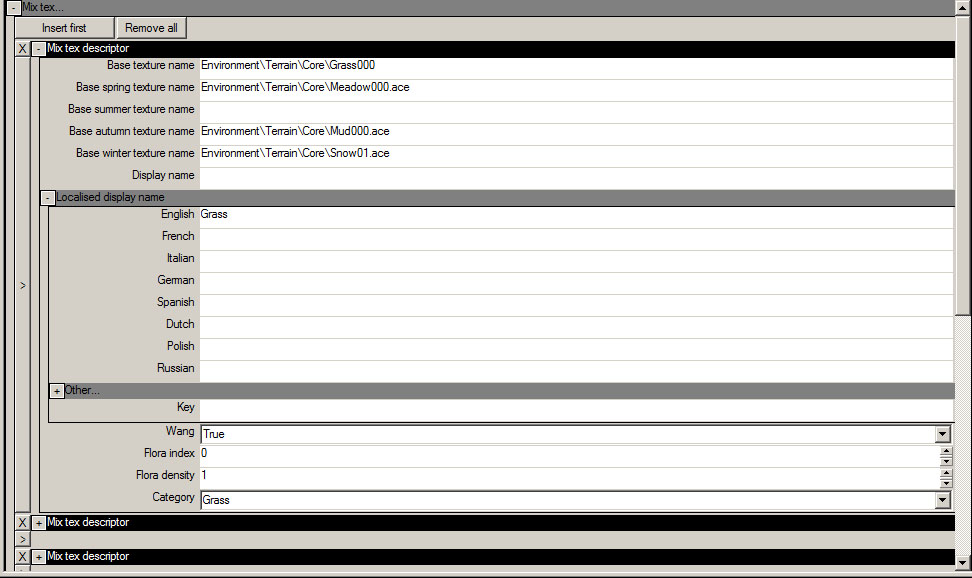
Spring
Summer
Autumn
Winter
Page 2 of 2