"Wang tiles" part 1

Wang tiles (or Wang dominoes), first proposed by mathematician, logician, and philosopher Hao Wang in 1961, are a class of formal systems. They are modelled visually by square tiles with a color on each side. A set of such tiles is selected, and copies of the tiles are arranged side by side with matching colors, without rotating or reflecting them.

Creating your own terrain texture set is the best way to make your route stand out from the crowd. It also allows you to order and control how you group your textures.

What is Wang?

Wang tiles are sets of textures that fit together to non-periodically tile across the terrain,
creating expanses of non repeating texture and avoiding the 'carpet' effect.
 
More info can be obtained by a very quick internet search. I have also seen applications that make the wang textures, however I have to say that I never seemed to get the results I wanted.
Making them by hand can be time consuming but like all things the more you make the easier it gets.
So, lets look at the basics before we get into the details.
 

Railworks uses 8 wang tiles to create a terrain texture and like everything in RWs they need to be named correctly.
For Example:

Grass01_A
Grass01_B
Grass01_C
Grass01_D
Grass01_E
Grass01_F
Grass01_G
Grass01_H


These textures need to be 32 bit which means they need an alpha channel. The Alpha channel is used for the blending between different texture sets.

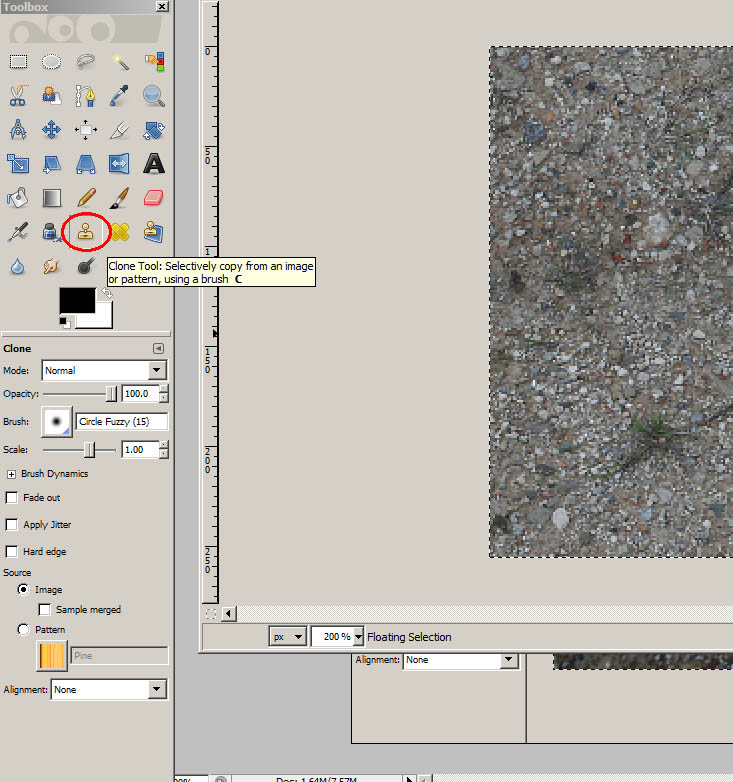
How do we get the textures to tile in a set?

The 8 textures in a set get tiled in a certain way. This can be best explained by using a colour diagram.
 
(see image below)
 
 
So, using this method I would make 4 key tileable 256/256 textures.
I name them; Red, Blue, Yellow and Green. This helps me keep track of what I am doing.
 
From these 4 textures (which each need to be tileable with itself) you can make the 8 you need.
 
So, to make texture A you would copy the top from red texture and place it at the top, right side from the yellow, blue from the left and green from the bottom. (see image below)
 
Texture_A
 
 
Texture_B

 
Texture_C


Next up in Part 2, picking the right image to get your textures from and getting the scale correct for ingame. (you don't want pebbles the size of footballs).

"Wang tiles" part 2

 
Now that we have the basics we need a suitable image to make the textures from.
When I go out and gather my reference pictures I usually take a number of photos of the same area so that I can get variation, however one high res image will usually do.

I have gathered a number of suitable textures already and they are freely available from my flickr site:

http://www.flickr.com/photos/46897232@N04/

I will be using the small stone floor texture. (see link below)

http://www.flickr.com/photos/46897232@N04/4571961761/sizes/o/

Save this image in a folder on your local drive.
I often make a workspace folder for each terrain texture so that the source files and finished ACE files are kept together till I am finished and they are ready to go in game.

For this I will not be using photoshop but will be using Gimp which is free to download, a quick internet search will find it.

Load up Gimp and open the photo you just saved. Our textures need to be 256/256 pixels in size and at the current resolution the image is not right.

Scale photo

In the tool bar click on Image and then scale image, in the new window reduce image size to 1000 pixels in width and 667 pixels in height, then click the scale button.

Your iamge will shrink on screen too, however you can use the magnifying glass to zoom in which is in the tools window on the left. As you can seen the image is not as crisp as it once was.

Sharpen Image

In the top tool bar click on Filter/Enhance/Sharpen

Move the slider till it is between 30 or 40 and click ok.

Safe image as a TGA file

On the top tool bar click File/Save as and type in Stone_Source01.tga

Another small window pops up about BLE compression, just click the save button without changing any settings.

creating your red,blue,green and yellow source textures

In the toolbox on the left click on the retangle selection tool and draw a box on your image.

We need that image to be 256/256 exactly so type in 256 in the selection box in the lower part of the toolbox.


Now move your selection box around the texture till you have an area that is suitable.

Please note that the aim is to have a texture that is detailed but lacks any large features that would show up once tiled.

Once you have found a suitable area click on Edit/Copy from the top tool bar, then click on File/new on top tool bar.
Type in 256 in the Width and height boxes and click ok.
This opens up a new image. (with it's own top tool bar) Click on the new top tool bar and click Edit/Paste.

Click on File/Save as and type in Red.tga Click on the flatten layers and click save.

Making the texture Tile

We now have an image that needs to tile to work.
Click on Layer/Transform/Offset from the top tool bar, type in 128 in the x and y boxes then click offset.

Now you have a texture that has the edges crossing in the middle of the texure. The good news is your texure will now tile along it's edges. We just need to remove the straight edges from the middle.

Clone brush

The clone brush is a wonderful tool that allows you to select an area of an image and paint it other another area.

Click on the clone tool (see image), select a fuzzy brush and make sure your brush is not to big or small, (15 pixels is about right)


Hold Ctrl down and select an area on your texture. This layers a marker where you will start your clone. Then paint over an area where you can see the square edge.

After you have painted a few details out, hold Ctrl down again and select another area of your texure and paint another straigh edge out. This keeps the area looking natural and random.
Do this till you can not see any straight lines, Click Save.


You now have one of your 4 textures, do the same for Green/yellow and blue textures.
For each one pick a new 256/256 area from your source texture.

While it may feel a little long winded, once you have got upto speed each image should only take a minute or so to make.
 

"Wang tiles" part 3

Open up Stone_Source01.tga that you saved from PART 2.
We now need to select 8 different areas of this image and make 8 different textures. You can pick any areas you think are suitable, Below is how I picked.


In the toolbox on the left click on the retangle selection tool and draw a box on your image.
We need that image to be 256/256 exactly so type in 256 in the selection box in the lower part of the toolbox. This will need to be done 8 times from the source image.
For each one click Edit/Copy from the top tool bar, then click on File/new on top tool bar.
Type in 256 in the Width and height boxes and click ok.
This opens up a new image. (with it's own top tool bar) Click on the new top tool bar and click Edit/Paste.

Click on File/Save as and type in Sm_Stones01_A Click on the flatten layers and click save.
Do this for all 8 textures, name each one as described in Part 1.

Sm_Stones01_A
Sm_Stones01_B
Sm_Stones01_C
Sm_Stones01_D
Sm_Stones01_E
Sm_Stones01_F
Sm_Stones01_G
Sm_Stones01_H

Once all of that is done close all the images down and open up the REd, Green, Blue and Yellow textures.
Also open up Sm_Stones01_A.

As seen in this image, we need red at the top, green at the bottom, blue on the left and yellow on the right.

Select the free select tool (1) and on the red.tga file left click and draw a triangle around the top section (2)


Click Edit/Copy from the top tool bar, then on the Sm_Stone01_A texture click Edit Paste as/New Layer. Align your new layer to the top edge. (3)

Make sure Snap is on so that your layer is snapped to the edge correctly. (View/Snap to Canvas Edges.)

Now click on the Red Eraser tool, select a circle fuzzy brush about size 15 and dab around edges of new selection so that you blend it in with the image below. You can toggle the layer on and off by clicking on the eye icon in the layers window (see image below)


Follow the above steps for the yellow/Green and blue layers, each time make sure you are happy with the result, you can always delete a layer and redo if not happy.

Once complete you now need to merge layers (you can save as a layered image but I tend not to bother on images that only take a few minutes ot make)

To merge the layers, click on Layer/Merge down on the top tool bar, do this for all layers.

Ok, almost there.

Now we need to make a alpha channel for the texture, (I am still unhappy about this process in Gimp and sure there is a better way)

On Sm_Stone_A top tool bar click on Edit/Copy, then Edit paste as/New layer, then click on Layer/Mask/Add Layer Mask on top tool bar. In the new pop up window click on Grayscale copy of layer, then click Add.

Over in the Layers window click off the background image
and leave just your new layer with a grayscale version which will get saved as your alpha channel.


Click on File/Save as keep the same name, confirm you will be replacing it and that you are saving a layered iamge as a TGA, Click on Merge layers and then click ok (lots to confirm! :) )

Repeat that process for each of your 8 textures, making sure you match the edges to the image seen here you will have a set of textures ready to be converted into Ace files, Well done!

First time round the process takes awhile, however after a few atempts it should take about 15 minutes per texture set.


"Wang tiles" part 4

Just a mini update this morning,

To make an Ace file without photoshop or ACDsee you will need Ben Laws excellent RWAce Tool located on our Website: http://www.railsimulator.com/en/support. under the Railworks art plugins heading.

Once downloaded, follow the install instructions and run the RWAceTool.exe

Click on the single image conversion first, browse for your textures and pick the first _A and click open. Then click view.
Here you can look at RGB texture or the alpha. Close the image down and click back.

Click on the Multiple image conversion.
Click the Add button on the right, then select your 8 textures, then open.
Click the Next button, then the Start button. The process will take a second. Once done click the finish button.
And there you have it your set of Ace files.